|
Clean Up Your Accounts Receivable Balances
|
It is important to keep your Accounts Receivable customer account balances accurate. In the normal course of business, a customer may return an item for which you have already recorded an invoice, customer payment, or sales receipt. These require the use of a credit memo or refund.
If you have any customer credit balances, you may choose to refund the customer. Open the credit memo that has the unapplied credit amounts. On the top ribbon, click the Use Credit to Give Refund icon or Issue a Refund, which will allow you to refund this by cash, check, or credit card.
During your Accounts Receivable review, you may discover customer balances due or credit balances. As long as you have NOT charged the customer sales tax you can write off these balances by following these steps:
To Clear a Balance Due Remaining
- From the Customers menu:
- Select Receive Payments
- Choose the customer in the Receive From field
- Click the invoice that you want to write off
- Click the Discounts and Credits icon in the top ribbon
- Click the Discount tab
- Enter the amount in Amount of Discount field
- Select Bad Debts in the Discount Account field
- Click Done to close the window
- Click Save & Close to close Receive Payments window
To Clear a Credit Balance Remaining
- From the Customers menu:
- Select Create Invoices
- Choose the customer in the Customer: Job field
- Select Clear AR Credit Balance item in the item field (See below to setup this item)
- Enter the amount of the credit balance
- Click the Apply Credits icon in the top ribbon
- Select the amount in the Available Credits window
- Click Done to close the window
- Click Save & Close to close invoice
To Create the Item 'Clear AR Credit Balance' to Use When Writing Off Credit Balances
- From the Lists menu:
- Choose Item Lists
- Click the Item button in the lower left corner
- Select New
- Choose Other Charge as the Item Type
- Enter Clear AR Credit Balance in the Item Name/Number field
- Select Non-Taxable Sales in the Tax Code field
- Select Other Income in the Account field
- Click OK to save and create the item
If you have charged the customer sales tax, we will cover this in an upcoming article.
Author:
Bev Brahmer, Certified QuickBooks ProAdvisor
715.748.1343
|
| Register for QuickBooks Training |
Join Hawkins Ash CPAs for a complimentary local QuickBooks desktop training event this fall.
In addition to the basics of getting around in the program and completing regular tasks, we will share tips and tricks that will help you accurately and efficiently use QuickBooks.
Topics covered during the training include the following:
- Basics of getting around in QuickBooks
- Writing checks
- Accounts payable
- Accounts receivable
- Reporting
The last hour of the seminar will include an in depth presentation of payroll in QuickBooks.
Green Bay, WI
October 19 |
Webinar
October 31 |
Manitowoc, WI
October 20 |
Rochester, MN
November 1 |
Winona, MN
October 23 |
Marshfield, WI
November 7 |
La Crosse, WI
October 24 |
Medford, WI
November 8 |
Please click below for more information and to register for a QuickBooks training event near you.
Do You Use QuickBooks Online?
For the first time, we're offering a free QuickBooks Online training webinar. This three-hour training will take place on November 3. For details and registration on this QuickBooks Online webinar, click below.
|
|
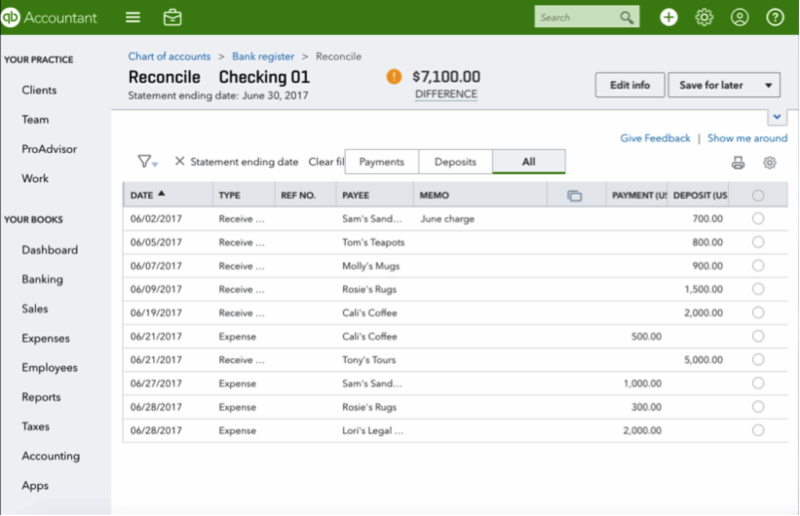
The New Look of Reconciliation for QuickBooks Online
|
In order for the reconciliation process to work efficiently with the rest of QuickBooks Online (QBO), it has recently been revised. The new design was developed to include enhancements QBO users requested and should make the reconciliation process quicker and easier.
The most noticeable change is the look of the reconciliation window itself. Prior to the change, the reconciliation screen contained two windows: payments on the left, deposits on the right. The window is now combined to show all transactions occurring in the reconciliation period. You can click on one of the tabs and have your transactions organized by Payments, Deposits or All. (See image below.)
Transactions can be filtered by a multitude of characteristics that include:
- Transaction status (all, cleared, not cleared)
- Transaction type (all, bill, bill payment, cc bill payment, cash, expense)
- Payee
- Date range
By clicking on the funnel located on the left side of the reconciliation window, you can also filter transactions by searching on memo, reference number (check number or ACH or EFT), check amount, or amounts that are less than or greater than a particular amount.
In the event that you need to edit a transaction while in the reconciliation window, click on that particular transaction. An edit window will appear. There you can make any necessary changes. Be sure to save the transaction before leaving the page.
To customize the reconciliation window, click on the gear located on the right side of the window. A smaller window will appear which will allow you to check or uncheck columns that you want to see during your reconciliation.
Remember, the reconciliation process is not for checking or savings accounts alone. You should also reconcile your credit card accounts using this process.

Author:
Julie Williams, QuickBooks Online Certified ProAdvisor
507.252.6675
|
|
How to Use the Timesheets Feature
|
You can use timesheets in QuickBooks to enter your employees' hours worked and create paychecks. You can also use timesheets to create a customer's invoice.
The first step is to setup the Timesheet and Time Entry in QuickBooks.
1. Setup QuickBooks Desktop for time tracking:
- Sign in as Admin and make sure you are in single-user mode.
- Click Edit (top menu bar)and click Preferences.
- Click Time & Expenses on the list on the left.
- Click the Company Preferences tab.
- Click Yes at the Do you track time? option.
- Select the First Day of Work Week your company uses. This selection will dictate the first day of your workweek on the weekly timesheets.
- Click OK.
2. If you are using timesheets for job costing purposes:
- Click Edit (top menu bar)and click Preferences.
- Click Payroll & Employees on the list on the left.
- Click the Company Preferences tab.
- Check the box Job Costing for Paycheck Expenses.
- Set up Service Items for job costing.
3. Setup employees for time tracking:
- Go to Employees in Payroll Center.
- Double click on employee name.
- Click the Payroll Info tab.
- Click the box Use Time Data to Create Paychecks.
- Click OK.
- Do this for each employee.
To create timesheets:
- From the Home window, click Enter Time.
- Choose one of the two options:
- Use Weekly Timesheet
- Time/Enter Single Activity
1. To record hours worked:
- Select employee name from the drop down arrow.
- Make sure your Week Of date range is correct.
- If the hours worked are billable, select a Customer: Job and Service Item, and click to select Billable? in the final column.
- Select the Payroll Item for time worked, and enter hours for each day worked. Click Save & New. Continue until all employees have been entered. Click Save & Close.
- If hours worked were not for a specific customer job, enter the Payroll Item and hours worked.
2. To enter
Batch Weekly Timesheets:
- If you have multiple employees working the same hours for the same customer, you can record the same timesheet for each of the employees selected.
- Click Employees > Enter Time > Use Weekly Timesheet.
- Click the Name dropdown and scroll up. Choose Multiple Names (Payroll).
- Choose the names from the Select Employee, Vendor or Other Name box, and click OK.
- Fill in the timesheet and click Save & New or Save & Close to record the time sheet for the multiple employees.
3.
To create Paychecks:
- Create paychecks as normal by clicking Pay Employees on the Home page.
- Verify the period end dates match the period end date from timesheets.
- Paychecks are created from the time previously entered in the timesheet. You can edit the time by clicking Open Paycheck Detail in Enter Payroll Information of the payroll window.
To print a blank timesheet:
- Click Employees on the top ribbon.
- Click Enter Time.
- Choose Use Weekly Timesheet.
- Select Print > Print Blank Timesheet.
- The blank timesheets can then be used by employees to record their daily time and customer jobs.
The timesheets feature in QuickBooks can shorten the process of entering employee time, especially if that time is billable to a customer. Please continue to follow this newsletter or Hawkins Ash CPAs on
Facebook or
LinkedIn. We will provide information on the Invoicing process soon.

Author:
Sue Woznick, Certified QuickBooks ProAdvisor
920.684.2553
|
Our QuickBooks Certified ProAdvisors
|
|
Green Bay, WI
|
|
920.336.9850
|
|
Advanced Certified ProAdvisor
Online Certified ProAdvisor
|
Certified Payroll Professional
Advanced Certified ProAdvisor
Online Advanced Certified ProAdvisor
|
Pai Kong
Online Certified ProAdvisor
Jodi Burton
Online Certified ProAdvisor |
| La Crosse, WI |
|
608.784.7737
|
|
Certified ProAdvisor
Online Certified ProAdvisor
|
Certified ProAdvisor
Online Certified ProAdvisor
|
Amy Breeser
Online Certified ProAdvisor |
Monica Hauser
Certified Public Accountant
Online Certified ProAdvisor |
Bob Spencer
Online Certified ProAdvisor |
|
| Manitowoc, WI |
|
920.684.7128
|
|
Certified ProAdvisor
Online Certified ProAdvisor
|
Sue Woznick
Certified ProAdvisor
Online Certified ProAdvisor
|
Michelle Budysz
Online Certified ProAdvisor |
| Marshfield, WI |
|
715.387.1131
|
Leslie Smith
Online Certified ProAdvisor |
Katie Forst
Online Certified ProAdvisor |
|
| Medford, WI |
|
715.748.2856
|
|
Certified ProAdvisor
Online Certified ProAdvisor
|
Barb Deml
Certified ProAdvisor
Online Certified ProAdvisor
|
Anjana Patel
Online Certified ProAdvisor
|
Misty Standke
Online Certified ProAdvisor |
|
|
| Rochester, MN |
|
507.424.1233
|
|
Certified Public Accountant
Certified ProAdvisor
|
Jennifer Kiehne
Certified ProAdvisor
Online Certified ProAdvisor
|
Joe Nurmi
Certified Public Accountant
Certified ProAdvisor
|
Julie Williams
Online Certified ProAdvisor
|
Morgan Haag
Online Certified ProAdvisor |
|
| Winona, MN |
|
507.452.8313
|
Joy Hoffman
Online Certified ProAdvisor |
Nancy Lewis
Online Certified ProAdvisor
|
Marie Belter
Online Certified ProAdvisor
|
Jeff Tillema
Certified Public Accountant
Online Certified ProAdvisor |
|
|
|
 |
|