Become Your Own Consort: Recording with the Acapella App
by James Howard Young
|
|
Have you seen those videos on Facebook of one recorder player performing all parts of a piece? It is as if they were playing as an entire consort by themselves. Almost any player, even those with a fear or lack of skill in technology, can produce such a video using their cell phone. This article will tell you how. For this tutorial, we are going to be recording a simple multitrack 4-part piece using Acapella for the iPhone or iPad and publishing it to Facebook. There is an Android version available in a test version, but this tutorial is specifically for iOS. You will need an iPhone or iPad, the Facebook app and an account, headphones, optional external microphone, short homophonic 4-part piece, and your instruments. An external microphone isn’t required to learn the app but can be a good investment later if you plan on taking it more seriously.
Step 1: Download and Install Acapella
· Search Acapella in the App Store
· Install “Acapella from PicPlayPost”
Step 2: Configure Your Phone
Configure Acapella to access your phone’s camera roll. Go to your phone’s settings. Once in settings, go to Privacy. Navigate to Photos and select Acapella. Toggle to “Add Photos Only.” Navigate back to Photos and select Facebook. Toggle “All Photos” if it isn’t already selected. If you have an external microphone, you can plug it in and make sure it’s working. Check that your phone plays sound as well and that your headphones are working. You can use a random YouTube video to check your sound.
|
|
Step 3: Launch Acapella and Create Session
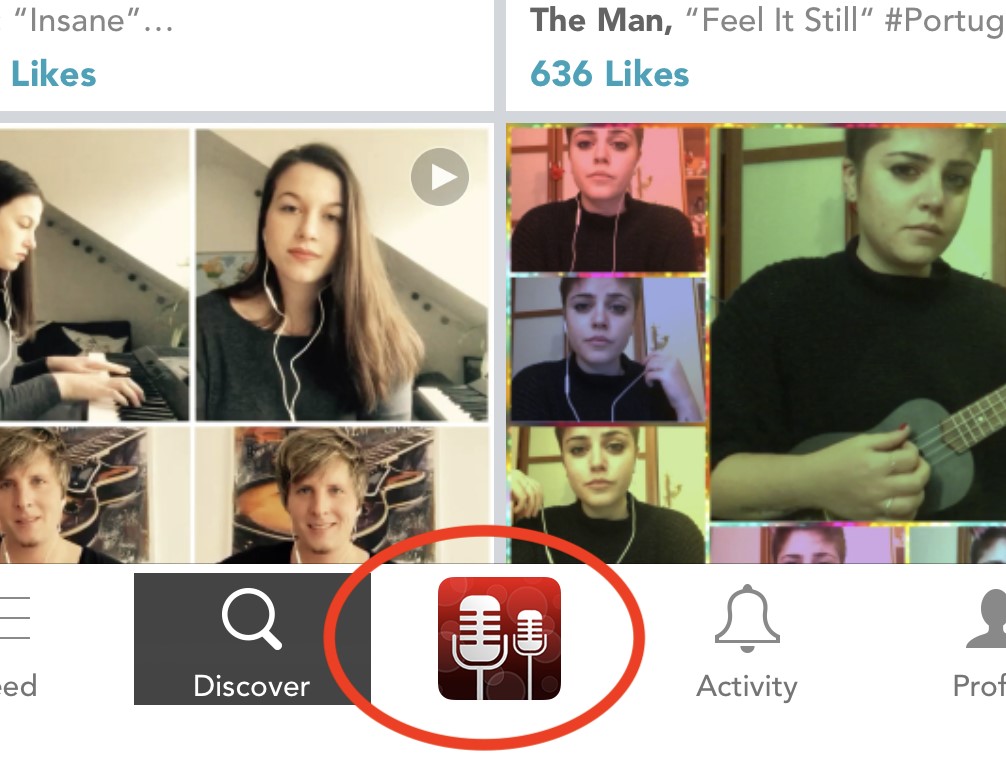
Find the Acapella icon and launch the app. The first thing you see is a collection of videos that other people have made and some icons at the bottom. Click the red microphone icon at the bottom.
|
|
Click Record New. You can only record and work on one project at a time. If you are working on a project, you will be prompted to remove your current project and start a new one. Click “Yes” if you are starting a new project. Note that if you stop work in the middle of a project, you can access it here later.
Now you have the option to select Classic or Premium layout for your video. This is where you choose how the multiple voices will be displayed. For this tutorial, we will choose “Classic.” The Premium Layout option requires a subscription.
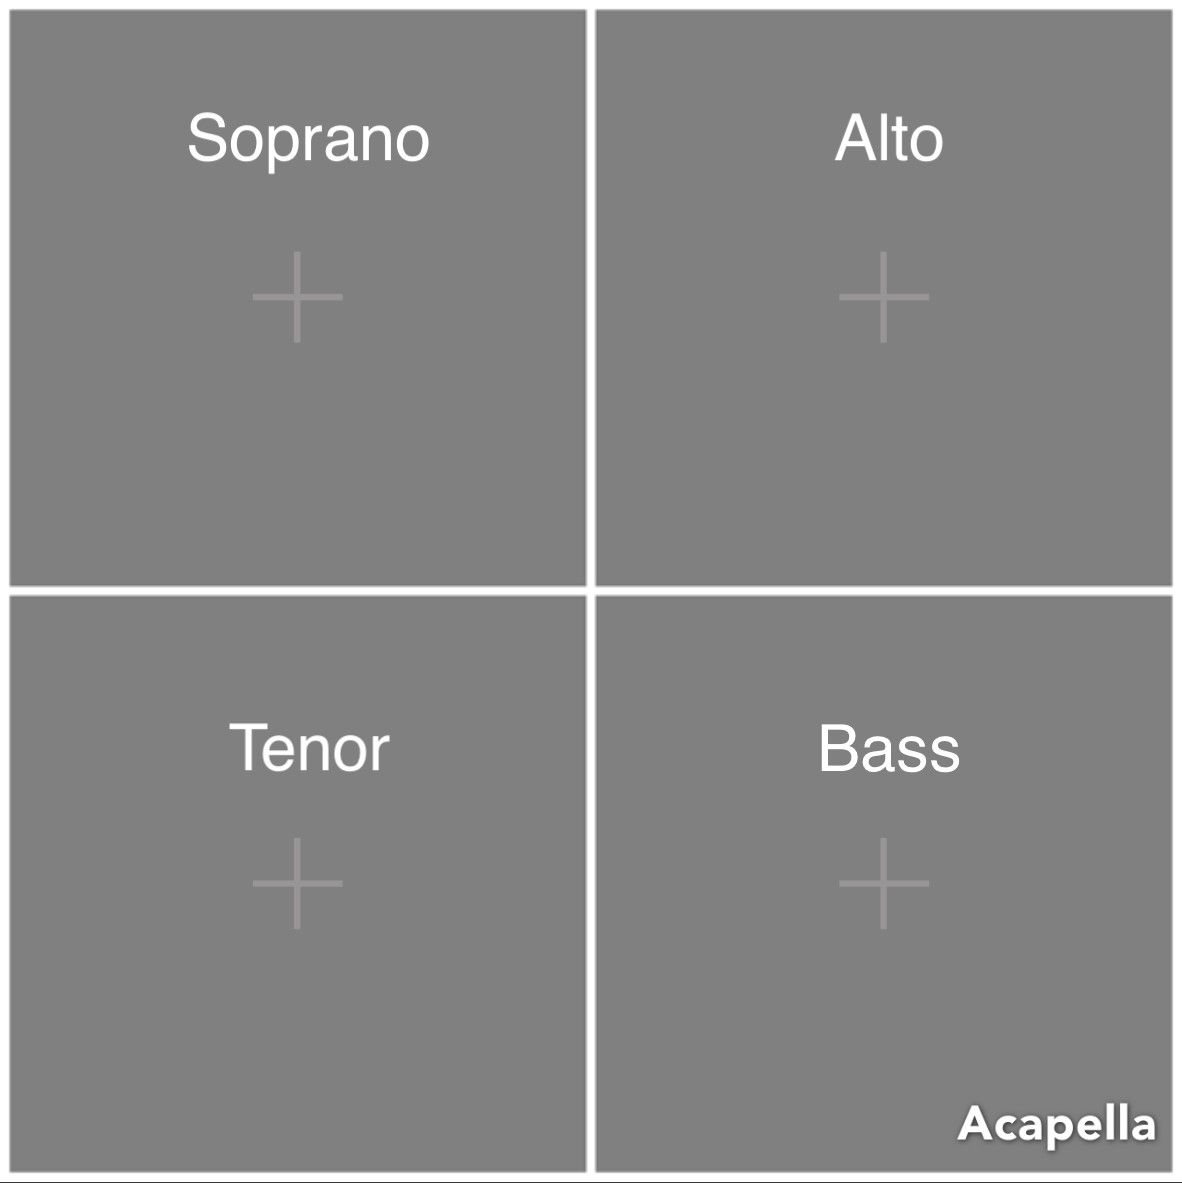
Go to the bottom and select the ratio. For this tutorial, we will use 1:1 which is a square layout suitable for viewing on mobile phones. We will use four squares, one for each of the four voices. Select the layout with 4 equal squares on the first page.
Choose the length. Note that the free version of Acapella only allows 30 second videos. You have the option to purchase the app later on for longer videos. You can also activate a 7-day trial period that will let you record longer videos by selecting “Try it Free” next to the length you want. But for now, let’s try with 30 seconds. Toggle to 30 seconds and click Next.
|
|
Step 4: Prepare Session for Recording
Now you are able to create your video. Note that you have 4 squares representing each voice you will be playing. For this tutorial we will be putting Soprano at upper left, Alto at upper right, Tenor at bottom left and Bass at bottom right.
Click the first square in the upper left to record the Soprano part first. The recording order is always a judgment call. For a piece such as the Susato dance we are using, it’s a good idea to record the Soprano first and work downwards. This is because the Soprano has the melody and informs the playing of the rest of the parts. For some pieces, you may want to record Bass first and for others, it might work to record another part first.
|
|
Tips Before Recording
Click on the Soprano square to preview your shot. Use a tripod or attach your phone to something stable so that the shot doesn’t shift between each recording. Record yourself straight to camera and show as much of your instrument and face as possible. Get far enough away from the camera so that the instrument is shown.
Avoid light that shines directly into the camera or strong light sources near the phone. The best lighting is an indirect source from somewhere else in the room not visible on camera.
|
|
Step 5: Additional Settings
Set the metronome by clicking on the metronome icon on the bottom left. I like to use a metronome but you can also choose to play the piece without one. Once you click the metronome icon, you can choose the time signature and tempo. Time signature will place an accented downbeat so for the Susato, you can choose 2/4 and play in cut time. A good tempo for this Ronde is about 60 to 80 for the half note. Push the play button to test your tempo. Toggle on upper right to “Play While Recording.” Use the x above to exit when you are done.
The remaining icons can change input quality (subscribers only) as well as add a base track and record full screen. We will leave those alone for now.
Step 6: Record Video
Get ready to play and then push the red button below the 4 squares. You will get a countdown from 4 in the correct tempo but always from 4 regardless of the time signature you have chosen. Record the Soprano part and make sure you line up with the metronome as best you can if you are using one. Click the red button again when done (note that you must record more than 6 seconds). If you play the piece without repeats, you may be able to finish within 30 seconds. If you were happy with that take, you can click Continue (you will get to hear the take in the next step). Otherwise, click Redo to record again.
|
|
Step 7: Listen to Your Take
Once you have approved of the take, you can use the preview band at the bottom to scroll through and listen to your result. If you are happy with that, click the green check above right. Now you can add the second part. Click the second square to the right to record the Alto part. Record the second part as you did the first, while hearing the first part. Make sure you are wearing headphones. Try to line the parts up as well as possible. Use the metronome and/or the other part as a guide. This will likely take a few tries to get right. Click Continue to approve the recording or Redo to do again.
Repeat for Tenor and Bass. Note that there are some icons on the bottom after you have approved your final recording where you can change some settings. These settings are for things like changing sound quality, adding filters, and adding panning and reverb. We will leave those alone for the time being.
|
|
Step 8: Finalize Video
Once you have finished recording, you can click “Save and Share” on the upper right. You get the option to either add your own watermark (subscribers only) or continue with Acapella’s built-in watermark. Choose “Continue with Watermark.” The watermark is the small label that will appear on the lower right of the completed video. If you then get the option to “Enable Photo Library” then please redo Step 2 at the beginning of the tutorial so that Acapella can access your photo library.
Step 9: Save Video
You will then see the share icons. We’re going to save the video to your camera roll so that you can upload it wherever you want. If we choose one of the social media icons, you will be able to post directly to your personal profile if you are logged in to them on your phone. But you may want to make a post in multiple places or post to a Facebook recorder group so let’s save to camera roll. Select Camera Roll. Select 720p Video (the higher resolution 1080p is a paid upgrade). Now you are done with Acapella.
|
|
Step 10: Publish to Facebook
Open your Facebook app. To make a post on Facebook, navigate to the group or page you want to post in and then click “Photo” where you would normally make a text post. This will call up your camera roll where you can select the video you just saved from Acapella (provided you gave it permission in Step 2). Select the video, hit done. Write some comments on the video and then make your post. You’re done!
|
|
James Howard Young is a professional recorder player and organist living in Denmark. He has published several videos of multitracked orchestral music using recorders and offers the scores and parts online.
|
|
How to Join the ARS
Take advantage of our 1/2 price rate for first-time members! Get immediate access to all the information available on our website, as well as other member benefits including the quarterly American Recorder magazine.
USA: First year $25/ Canada: $30
|
|
|
P.O. Box 480054 Charlotte
NC 28269-5300
Phone: 1-704-509-1422
Toll Free: 1-844-509-1422
Fax: 1-866-773-1538
|
|
|
|
|
|
|
|