Did you know you can hide Document Types from your Doc List?
 
Hiding a Doc Type doesn't get rid of any information, it will simply not display by default when you open the Doc List. This is an agency wide setting, so you would have to be an administrator to make this change or any subsequent modifications.
 
 
To hide a Doc Type, go to Setup -> Code/List Maintenance -> Doc Types (Red Boxes). Choose the Doc Type you want hidden from the list on the left and take out the check mark next to Include in Doc List Default "All Selected Types" (Purple Boxes).
 
 
A common Doc Type to hide is Download. In the example below, you can see the difference between hiding it and displaying all document types.  
 
Displaying every Document Type, including Download:
 

Displaying every Document Type, excluding Download: 
 
The Documentation List is shorter and only displays items you have included as a 'Selected Type'. You can use the same steps to personalize the items that will display when the Doc Type is 'All Selected Types'. To display everything, change the Document Type to 'All Types'.  
 
For more information on this topic, please contact Support by calling 320-352-1801, or via email at Support@nasasoft.com.
 
Download Updates 
 
The following companies are now certified to download with us:       
-  Western Iowa Mutual Insurance Association
 
The following companies have new LOBs certified to download with us:
-  Donegal Mutual - eDocs
-  Lighthouse Property Ins - HOME, DFIRE
-  Service Lloyds Insurance Co - DBComm
-  Loudoun Mutual - eDocs
 
  For a complete list of all the companies NASA is certified to download with click here or visit our website, nasasoft.com. Click on Product Info and then Company Download Partners. To begin receiving any of these new download options, please contact the company and request them.

Upcoming Events
January  
 
15th- MLK Jr. Day 
31st- Support Meeting *
 
 
* There will be limited support from 8am-9am CST during the Support Meeting. They are held the last Wednesday of every month.  
February
 
2nd- Groundhog Day
12th- Lincoln's Birthday
13th- Mardi Gras
14th- Valentine's Day
19th- Washington's Birthday and President's Day
28th- Support Meeting

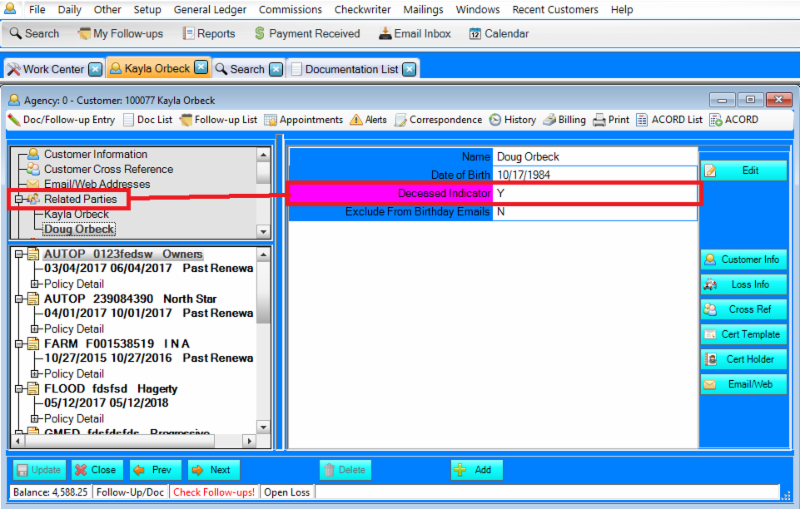
How to mark a customer as deceased
 
When a customer passes away, you will want to mark them as deceased in Eclipse. This will be done from Customer Screen under the Related Parties in the upper Left section. To set the indicator, double click on Related Parties and then select the button after the name of the customer you are going to work with. Hit Edit and change the Deceased Indicator from N to Y. Hit Update to save the change.  
 
 
Marking someone as deceased will prevent their birthday from appearing under the Automated Birthday Emails and well as the Birthday Report.


Holiday fun at NASA!
We celebrated Christmas by decorating the office, doing a Secret Santa, our 4th annual bell ringing for the Salvation Army, and topped it off with a big pot-luck!
 

Back row from left to right: Mikayla, Murriya, Kayla, Amy, Stacie, Kelsey and Deb  
Front row: Angie and Anna
Don't forget to check out the Knowledge Base for more tips and tricks!