| Monthly Newsletter March 2016 |
|
|
|
|
|
|
|
Hello Braiders,
Hola de México (Hello from Mexico)! On February 28th  our group of 6 departed from Reno, NV and met up with several others in Dallas and eventually all 27 of us gathered in Guanajuato, Mexico. We are now here, in Mexico, for our 12 day Knitting & Kumihimo Retreat. After a few days in Guanajuato, we will make a short trip for the remainder of our stay in San Miguel de Allende. our group of 6 departed from Reno, NV and met up with several others in Dallas and eventually all 27 of us gathered in Guanajuato, Mexico. We are now here, in Mexico, for our 12 day Knitting & Kumihimo Retreat. After a few days in Guanajuato, we will make a short trip for the remainder of our stay in San Miguel de Allende.
What a Braid (aka What a Knit) is closed until March 12th. I will start packing and mailing orders as soon as I return. Orders will go out in a first in - first out order.
Click here to follow
WHAT A BRAID on our San Miguel de Allende Knitting & Kumihimo Retreat!
|
|
|
|
|
Thank you - March Free Shipping
|

I really appreciate your patience while I am away teaching. As much as I have thought about showing my dear hubby how to pack orders while I am away.....I don't think so!
For the month of March I am providing
Free Shipping on all orders over $25 (International Orders not included).
Please feel free to place orders while I am away. I do my very best to get them mailed immediately upon my return (March 12).
|
|
Kumihimo Kit of the Month "Beaded Necklace with Porcelain Donut"
|
This is my new favorite. It's quick and easy and fun to wear.
This kit teaches you a fun way to attach a donut pendant and also uses
the adjustable closure
. It sure is nice to make a necklace an inch or two longer or, conversely, an inch or two shorter. Flexibility works well with my wardrobe. The Porcelain Pendant is 1 3/4" in
diameter, the braided sections are each 7" and the braided tails, on either end, are each 6". The necklace can be worn anywhere from 16 " to 25" (give or take). You will need: Kumihimo Disk (I highly recommend the
BeadSmith Thick Mini), 8 Bobbins (I use small plastic EZ Bobbins), Scissors and Tape Measure. You should know: Kumihimo Round Braid (also known as Kongoh Gumi)
and How to Drop Beads.
Kit includes:
- 1 spool of C-Lon Bead Cord (you will have extra for another project)
- 4 colors 8/0 Toho/Miyuki Seed Beads
- 1 Porcelain Donut
- 1 Porcelain Pony Bead
- 1 Barrel for Closure
- Instructions with Photos
- 6 Color Ways
- Cost: $32 - $36
|
|
| Color Sample / Azure Blue |
|
|
Kumihimo Tip #37 - Some Talk About Finishing Cord Ends
|
We all love the process of braiding. However, often times our efforts fall short when it comes to finishing our braids. I hear about alot of braids that are just
waiting
for their end caps. I have a few tips to take the fuss out of finishing
Determine how you will finish the ends. One of the first things to consider is what your braid is made of. Is the fiber synthetic or natural? 
- If the braid is a synthetic fiber (i.e. C-Lon, S-Lon, Nylon, Polyester, etc.) you can cut or "zap" the ends with a thread burner. The thread burner has a very hot tip and this hot tip very quickly cuts and melts the end of the cord. If done correctly, the cut is accurate and the ends are melted together and they will not come undone. At this point, the end is ready for an end cap.
There are several thread burners on the market. Some are a little "sturdier" than others and last longer and some are more powerful in that they can cut and melt a thicker braid. I have used the BeadSmith Thread Zap II as well as the BeadSmith Cord Zap (Heavy Duty). The Cord Zap is the hottest and I really like it. It cuts through an 8-strand braid of C-Lon Tex 400 like a hot knife slicing through butter. You actually have to be careful.
- If the braid is made up of a natural fiber, like embroidery floss, perle cotton, USA made Rayon/Cotton Satin Cord, Kumihimo Rayon Ribbon, Kumihimo Rayon Gimp, Silk, etc., melting the end of the braid is NOT an option. Natural fibers do not melt. In this case, one option is to stitch the ends to prevent raveling. I take a needle and sewing thread and stitch carefully back and forth through the braid a few of times. The idea is to catch some of the ends. I then wrap the thread around the braid, tie the thread off with a knot and the cut the braid near the stitching. It is important to work neat and clean.
  
- I have also experimented with and had great results using Fray Check on both synthetic and natural fibers braids to halt the raveling process. I use the tip of the Fray Check bottle to carefully saturate the area of braid that I want to cut. After the saturated section of braid has thoroughly dried (very important) I cut the braid. This has worked quite well. I think this is one of my NEW favorite discoveries for dealing with cord ends. Just make sure you let the Fray Check really dry.
 
When the ends are finished, you can easily insert them into your end caps. Everyone has
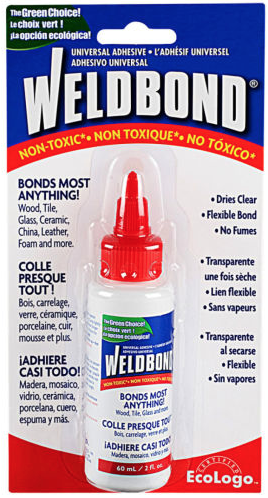 their own favorite when it comes to glue. I, along with many of my braiding friends, swear by WeldBond Universal Glue. It is easy to use, odorless, dries in an hour, cures in 24 and dries clear. If you let the glue really dry, the hold is phenomenal. WeldBond is available at some craft stores as well as Ace Hardware (in stores and on-line).
The most important thing is to work neat, clean and minimally. Make sure you have all the correct tools and your work space is in order. Be methodical and neat and your results will be excellent.
Click here for more helpful Kumihimo articles. |
|
Kumihimo Tip #38 - Some Talk About Bracelet Sizing
|
Bracelets come in all shapes
|
|
Designed by ©Karen Huntoon 2016 - Bracelet Class taught in San Miguel de Allende, Mexico 2/2016
Kits Coming soon! |
and sizes. Some a
re flat, some are thick, some are
supposed to fit
close to the wrist, others a little lo
oser, etc.
The requirements for bracelet sizing are more precise than for a necklace. A
1/
2" in a necklace is not so critical as it would be for a bracelet (unless of course you are talking about a choker)!
Let's take a look at some of the things to consider when designing a bracelet and determining the correct sizing.
There are published charts all over the internet with suggested finished length bracelet sizes (chart below).
| Women's Bracelet Sizing |
Length |
| Small |
7" |
| Medium |
7 1/2" to 8" |
| Large |
8 1/2" |
| Plus |
9" |
Or you can be a little more precise and measure your wrist.

1. Take a tape measure or something else that is flexible and wrap it around your wrist. Note the measurement.
2. Think about how you like your bracelets to fit or if the style of a particular bracelet dictates a specific fit. Add this to your wrist measurement. This would be your "desired finished length".
3. Another important consideration when sizing a bracelet is to consider the bulk of the materials that make up the braid/bracelet. Is the fiber thick? Are the beads chunky? The bulkier the bracelet components, the smaller the inner circumference of the bracelet and the longer you need to make your bracelet. For example, when I am making a flat beaded bracelet with 8/0 seed beads, I only add a 1/2" or so to my wrist measurement to obtain my desired finished length. If the bracelet is bulky, like the Staggered Spiral Bracelet (below), I may add as much as 1 1/2" to obtain my desired finished length. It is all subjective, but these are all things to consider. The example below shows my Staggered Spiral (bulkier style) Bracelet compared to my Flat Bracelet. The bulkier bracelet is longer but the fit on my wrist is similar.
|
|
|
The "bulkier" bracelet is longer than the flat bracelet, yet the desired finished length and fit is nearly the same. Bulkier bracelets require more length.
|
4. Once you know what length you want your finished bracelet, it is important to consider the length that the actual end cap will add. I measure the end cap and then subtract the depth of the holes in the end caps that my braids will fit into.
Desired
Finished
Length of Bracelet = Rough Bracelet Length + End Cap
Rough Bracelet Length = Desired
Finished
Length - End Cap.
Use common sense. If you have a small wrist, don't drop as many beads and if you have a larger wrist, you will need to add more beads (follow sequence of bead loading per whatever pattern you may be following). Check the fit as you are braiding and stop or keeping braiding as needed.
.
|
|
Staggered Spiral Bracelet Kit
|

Since we are talking about bracelets, I thought I would show this one again!
The "Staggered Spiral" Petals Bracelet is bold and makes a statement!
Every time I wear this bracelet I get compliments. It's fun. The Staggered Spiral Petals Bracelet is composed of Pressed Glass Petals and a balanced mixture of 8/0 and 6/0 seed beads. The Button & Loop closure is fabulous and is a technique that can be used over and over and over again. The patt
e
rn is written for a beaded
portion that ranges anywhere from 6 1/2" to 7" (depending on
beads and braider). There are enough beads to make the bracelet a little longer and beads can be
eliminated for a shorter bracelet. The Button & Loop Closure facilitates a deg
ree of flexibility in sizing and the pattern insert, with
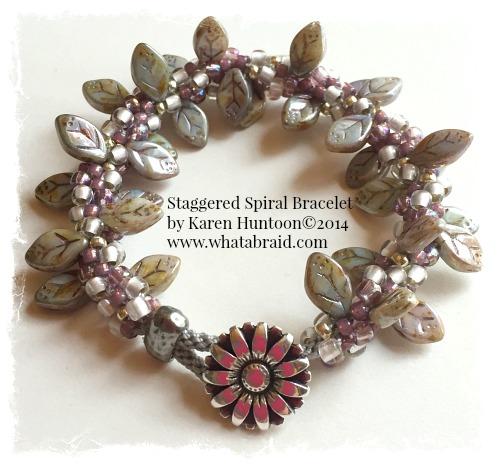 
sizing tips, is helpful too. With this kit you will make an all beaded bracelet and you will learn the Button & Loop
closure technique.
You will Need:
Kumihimo Disk, 8 Bobbins, Measuring Tape, Scis
sors, Needle and Heavy Duty Thread (to sew through braid),
Glue (I like WeldBond - available at Ace Hardware stores and some craft stores).
You Should Know:
Kumihimo Round Braid, how to "drop" beads. If you aren't sure how to "drop" beads, it's very easy and you can check out
Kumihimo Tip #14
.
Kit includes: 
- 33 Pressed Glass Petals
- 1 Spool C-Lon Beadcord (you will have plenty for additional projects)
- 8/0 Toho or Miyuki Seed Beads
- 6/0 Toho or Miyuki Seed Beads
- Button & Barrel for Closure
- Wide Eye Needle
- Instructions with Photos
- Available in 6 colorways: Turquoise (New), Vitral Aquamarine (New), Bronze (New), Hematite, Opaque Neutral (New) and Milky Picasso Brick (New)!
- $24 - $26
Click here to see all Kumihimo Bracelet Kits.
|
|
Kumihimo Artist of the Month - Jan Strasser
|

Jan Strasser - Florida
One of the perks of
What a Braid is feeling the excitement when a new person discovers the pleasure and fun of Kumihimo. It makes my day when I open my email and find photos that someone has sent of something they have just created and braided.
This months creation is the work of Jan Strasser of Avon Park, Florida. She just started Kumihimo 2 weeks ago and she has already designed this necklace made up of 8/0 Miyuki Picasso Turquoise Seed Beads and Miyuki Picasso Turquoise 4 x 7 Magatma Beads. Jan says, " I am 68 years old and started beaded kumihimo only 2 weeks ago and have gone "crazy" over it! I am a newly retired nurse. I have been creating beaded jewelry for about 3 years and wanted to learn something different." She has found information in books, You-Tube and the internet. She says she discovered What a Braid and read all of the
Kumihimo Tips at least 5 times! She put a couple of techniques together and came up with her gorgeous necklace. She added, "Counting, a calculator and correct tension are important!"
Here is her description of the necklace,"The necklace is 23 1/2 inches long, not counting end caps and clasp. I used 8/0 Miyuki (Seed Beads) Picasso Turquoise and 4x7 Magatama Picasso Turquoise Beads from "What a Braid". The magatama beads were strung in any direction - I did not line them up. For the beads I strung 160 8/0 beads, at the north/south positions and 64 8/0 beads, 33 magatama, 64 8/0 at the east/west positions. I used S-Lon BeadCord." I started with braiding a few sequences with out beads. I used a weight that I made out of a paperclip and a fishing weight."
Thank you Jan and Enjoy!
|
|
What a Knit/What a Braid Monthly Newsletters
|
|
|
|
Reminder....
|

Copyrighted patterns are not to be copied, shared electronically, given to friends or members of the guild
or used for teaching purposes
without express consent of the author. What a Knit or What a Braid patterns are for your personal use. Feel free to sell your creations but remember to give proper credit to the D
esigner.
If you decide you want to write a tutorial,
it is not appropriate to "borrow" parts of a copyrighted pattern.
|
|
Facebook, Instagram & Pinterest
|
|
Find What a Braid on Facebook, Instagram and Pinterest!
|
|
 
Please share this newsletter with your Kumihimo friends!
You can subscribe here or on my website www.whatabraid.com
|
|
|
|
|


