|
Deal of the Week
by Bucky Sydnor
(sydnoriv@yahoo.com)
Here's To Hope
One of the things I do to strengthen my game is to re-read Eddie Kantar’s Modern Bridge Defense. My last time through I was struck about how often the word ‘hope’ appears.
As we gain experience in bridge, we find that sometimes when declaring, the only way to make a contract is to play as just that—to hope (!) that all the opponents’ cards lie just right for you to make that contract.
For instance, at a regional in California some years back, Steve Becker opened 2♣, I bid 2♦ (waiting), he bid 2NT and I bid 3NT. Unfortunately, that did not end the auction as I had forgotten our system, namely, 3NT showed 5 spades and 4 hearts and a game-going hand. Sadly I had 6 clubs and 6 HCP.
So Steve bid on to 4♠, as he held 3 spades. I tried to get us to a makeable contract, but there was no chance and when the dust settled Steve was declaring 6NT. After the deal, he observed that there was about a 6% chance the cards lay in such a way that he could have made 6NT. They didn’t; they lay in the 94% way. Down he went.
Today’s deal is an example of playing for a specific lie of the cards. I am third seat vulnerable holding:
♠KQJ10732 ♥AQ ♦K ♣952
And I hear—actually I see—my partner open 1♣. The auction proceeds:
1♣ – 1♠
1NT – 2♦ (NMF)
3♠--....
I am in luck: my partner has 3 spades and a maximum opener. Now I begin to think about a spade slam. I do not need much from partner. While my 3 low clubs are a danger sign, partner did open 1♣. I only need two aces and some useful honors to make slam. The worst that can happen is that we are off the ♣AK and the opponents lead clubs initially. I also decide that it is safe to bid to the 5 level, so I start RKC for spades. (Note: That was poor thinking; I should have started cue bidding to learn if partner had clubs covered since I had 3 worthless ones.)
The auction continues:
1♣ – 1♠
1NT – 2♦ (NMF)
3♠ – 4NT
5♥ – 6♠
That ends the auction, LHO tables a low heart and here are our 2 hands:
♠A54 ♥K10 ♦J108 ♣AQ643
♠KQJ10732 ♥AQ ♦K ♣952
Partner definitely has a nice hand for me, with his two aces and the ♥K. But we have duplicated values in hearts, both having doubletons. This means hearts will provide only 2 tricks, not 3, lowering my trick count by one. It appears that I have to lose the ♦A and at least 1 club.
Do you see a way out of my problem? To get some perspective, let’s take a look at my winners: 7 spades, 2 hearts and 1 club for a total of 10. I need the ♣K to be in the slot to bring my count to 11. That puts me right back where I started from: 1 diamond and 1 club loser.
To be down “only” one, I need the ♣K to be in the slot. But if one other card is in the right place I can make a 12th trick. Do you see it? It is the ♦Q; she needs to be on my right. I don’t care where the ♦A is; that is a sure loser barring a defensive error. I only care that the ♦Q is on my right.
So, I win the heart lead with my ♥A and draw trumps in two rounds, ending in Dummy. I then play Dummy’s ♥K, stripping that suit, and lead a low diamond. RHO tanks and then rises with her ♦A. She then makes a defensive error and leads her ♦Q. I ruff it high (though not essential here, this is good technique and worth doing here to form a habit of maintaining communication between the two hands whenever I can), lead a club to the ♣Q, which holds, and cash the ♦J, pitching my losing club.
RHO’s lead of the ♦Q was horribly wrong because having played my obvious singleton ♦K under her ace, she should try to make life harder for me. She can only lead a club or diamond, without giving me a ruff and a slough, but if she is going to lead a diamond, she should lead low, hoping I chicken out on finessing her for the ♦Q. I cannot afford to chicken out: to make my contact I must play her for the ♦Q.
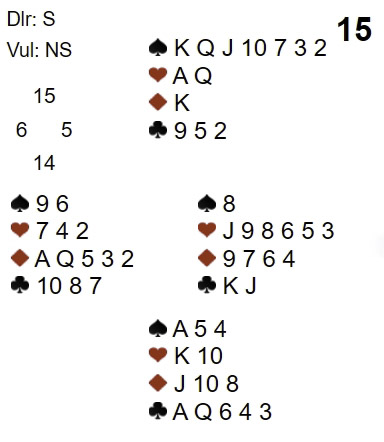
Here's the full deal:
|