QUICKBOOKS
UPDATE
Tips and Tricks to Help You Better Use QuickBooks.
| Hawkins Ash CPAs
|
|
In this Edition
June 2020
How To Use QuickBooks Desktop in Multi-Monitor Mode
How To Track, Record and Pay Payroll Liabilities in QuickBooks Desktop
Utilizing QuickBooks Reminders and To-Dos
Transferring Funds in QuickBooks Desktop
The Benefits of QuickBooks Backup and Restore
|
|
|
How To Use QuickBooks Desktop in Multi-Monitor Mode
|
|
Have you ever wanted to open your check register in one window, be able to display the bank reconcile feature in another window and then open a specific transaction for review in a third window? This is possible in QuickBooks Desktop 2018 and later versions.
By using the
Multi-Monitor Mode feature, you would be able to spread out your QuickBooks Desktop application across the various monitors. This would help you get more done in a way that best suits your monitor configuration and personal workflow. Working in a multi-monitor environment can increase your productivity and better manage your financial information.
Before enabling this feature, you must do the following:
- Set the DPI (font scaling) settings for all screens and monitors at default level (100 percent)
- Set all screens and monitors at the same resolution
- Align your monitors horizontally in your Window Display settings
- Use the toggle button to move windows from one monitor to the next
Then follow these directions to activate this feature:
- Go to the top menu bar and click View, then
- Switch to Multi-Monitor Mode
There
are some limitations of which you need to be aware:
- You cannot be using Single View mode; check your preferences in the Edit menu, then select Preferences and Desktop View
- Some third party multi-monitor programs will not work properly with QuickBooks Multi-Monitor Mode. Use Windows native Multi-Monitor support
- You are unable to use the QuickBooks function to tile or cascade windows
- You will need to switch to Single-Monitor Mode to move the QuickBooks main program window
- Cannot be in a hosted environment such as Right Networks or Summit Hosting
Some other common issues and solutions may be:
|
|
ISSUE:
Dialogue boxes appear on the other monitor from the one on which I am working.
SOLUTION:
Simply toggle it back to the correct monitor or move it manually.
|
|
ISSUE:
Certain windows extend across into the other monitor.
SOLUTION:
Simply move that window to the correct monitor and either maximize it to that screen or adjust the window width.
|
|
|
|
|
Author:
Bev Brahmer
, Certified QuickBooks ProAdvisor
Direct:
715.748.1343
|
|
How To Track, Record and Pay Payroll Liabilities in QuickBooks Desktop
|
|
If you have QuickBooks payroll for Desktop, tracking and paying payroll liabilities can be a quick way to be reminded when your payroll deposits are due and how much is owed.
Most common pay items and tax types are set up automatically during the initial payroll setup. Annual limits such as the Social Security tax wage limit update automatically at the start of each year. For those items that are not updated automatically (such as state unemployment tax rates), adding or modifying them is very simple.
For an example, here is how to update the Minnesota and Wisconsin unemployment tax rate:
- Click on Lists, then Payroll Item List
- Find the liability in the list: MN – Unemployment Company or WI – Unemployment Company
- Right-click on it, then click Edit Payroll Item from the pop-up menu; click Next
- Verify that the liability and expense accounts for the payroll item are correct and click Next
- Add each quarter employment tax rate for the current year (for Minnesota and Wisconsin, all four quarters are the same)
- The rest of the setup should be fine, so click Next until you reach the end; then click Finish
To schedule and pay your federal and state tax liability in QuickBooks, you must first set up your payment schedule. To do this, go to
Employees then
Payroll Taxes and Liabilities then
Pay Scheduled Liabilities.
- At the bottom of the screen under Other Activities, click Manage Payment Methods
- Click Schedule Payments
- Choose Federal 941/944/943 and click Edit
- Choose E-pay for the deposit method, enter your Federal EIN under Account Number and choose your deposit schedule for payment (deposit) frequency
- Set up a bank account from which the payment will withdraw
- Repeat this process for all payment schedules in your scheduled tax payments list; when you are done, click Finish Later
Once you have your payment frequency set up, QuickBooks will start tracking your tax liability and the liability window will show you the date to send the payment. When you are ready to schedule your payments, on the same screen mentioned above, click
Federal 941/944/943, then
E-pay. Change the payment date and to the due date (bottom left of check window) and click E-pay.
Note: The first time you E-pay federal liabilities, you will have to enter and confirm your EFTPS PIN and password and enter your contact information.
Click
Remember My Information for Next Time and submit.
Use the same steps for state withholding.
Feel free to
contact us with any issues you may have.
|
|
|
|
Author:
Heather Whitten, EA
Direct:
507.252.6677
|
|
Utilizing QuickBooks Reminders and To-Dos
|
|
Some people do not realize that QuickBooks has a couple of handy features to help you stay organized. These are the
Reminders feature and
To Do List. Here is how you can simplify your tasks by setting up the Reminders List in conjunction with the To Do List.
Reminders
The Reminders feature can be utilized to remind you of when to pay a bill, follow up with a customer on an overdue payment or reach out to an employee with a payroll question. To set up Reminders, just follow these steps:
- Open the Edit menu and select Preferences
- Select Reminders in the left pane
- With the My Preferences tab selected, check the box to Show Reminders List when opening a Company file (this is optional, only if you want the window to appear every time you open your QuickBooks file)
- Then select the Company Preferences tab. Here you can set the parameters of what reminders you need and the number of days before the task is due. You can also choose between Show Summary and Show List:
- Show Summary gives you the option to group tasks
- Show List gives you the option to keep the tasks separated
To Do List
The
To Do List also can provide important reminders of when tasks need to be completed, such as paying taxes or filing forms. These steps will walk you through setting up a task:
- Open the Company menu and select To Do List
- Click the To Do dropdown button, and then choose New To Do
- In the Add To Do window, select the type of to-do note you would like to create from the Type dropdown menu
- Select the priority from the Priority dropdown menu
- If the task requires another individual to be involved, check the With box; choose the type of individual from the first dropdown menu, and then the specific person from the second dropdown menu
- Enter the date the task is Due
- To specify a time, check the box next to Time and then set the time needed
- You must enter details of the to-do into the Details field
- Then choose the status of the to-do by selecting the appropriate option from the Status dropdown
- Click the OK button to add the to-do to your list
- Repeat as necessary
Both the Reminders and To Do List features can help you to stay on top of payroll and other tasks and not miss a deadline. They also will help you to clear off your monitor and desk of all the Post-It note reminders!
|
|
|
|
Author:
Debbie Denny
, Advanced Certified QuickBooks Desktop ProAdvisor, Certified QuickBooks Online ProAdvisor
Direct: 920.337.4558
|
|
Transferring Funds in QuickBooks Desktop
|
|
Have you ever had to move funds from one checking account to another? Or perhaps from a checking account to a savings account? QuickBooks Desktop has a feature to make recording these types of transactions easy.
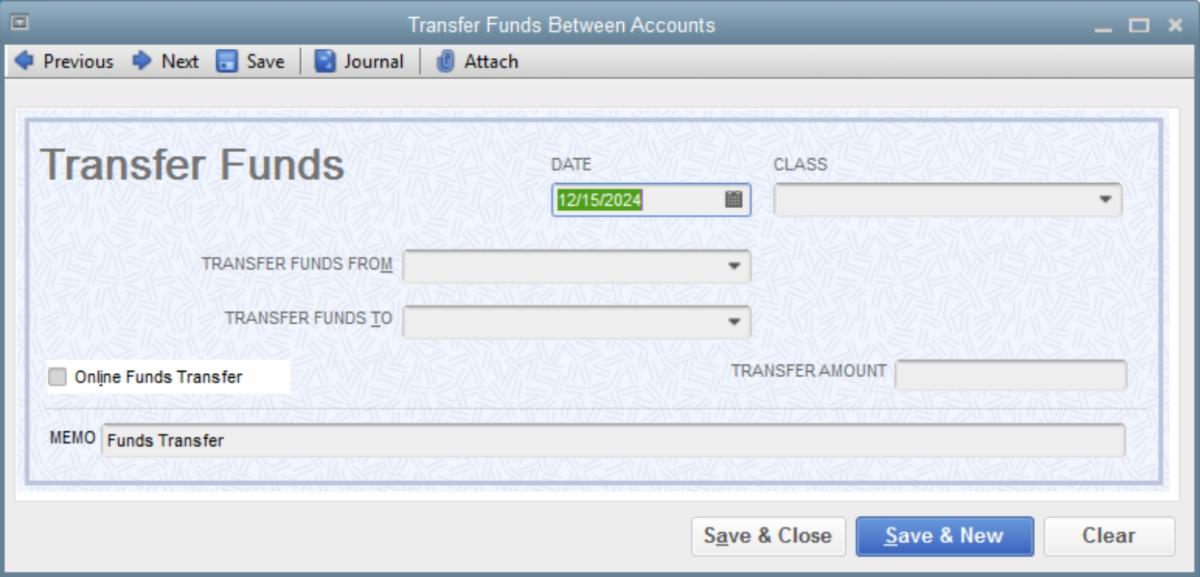
- From the menu bar, go to Banking and select Transfer Funds. The box below will appear:
|
|
- Enter in the relevant information:
- Date
- Account to transfer funds from
- Account to transfer funds to
- Class (if applicable)
- The amount of the transfer
- Save & Close if there is only the one transfer to record
- Save & New if there are more transfers to record
In only a few simple steps, using this Transfer Funds feature will help keep these types of transactions recorded and organized for future reference.
|
|
|
|
Author:
Becky Doyle, CPP
, Advanced Certified QuickBooks ProAdvisor
Direct:
920.337.4524
|
|
The Benefits of QuickBooks Backup and Restore
|
|
As the administrator of your QuickBooks Online (QBO) file, it is your job to make sure that your books are correct, workable and that you can maintain the continuity of those books. To help preserve your records, QBO has rolled out a tool that can assist you in maintaining your QB file.
QBO Advanced users can now utilize an app called
Online Backup and Restore. This app allows the administrator to create multiple backups of the QBO file and to use these to restore QBO to a specific point in time. Because this is an app, it can only be installed by the QBO administrator, but it
is available at no cost through the app store.
Within the app, the user has several options for backups.
- Continuous backup will save changes to the QBO file on a constant basis (though you may have to wait five to 10 minutes for recent changes to be saved).
- You can also create a backup on the spot and move forward with your work.
- Finally, the user can also create an external backup of their QBO file. The great thing about this one is that the external backup can be scheduled and sent automatically to Dropbox or Google, so that you are always covered.
Now, there are a few things that are not included with these backups, such as recurring transactions, audit log entries, some custom reports and a few others. However, these items are non-posting items that do not directly affect the accounts.
Lastly, there is one more benefit to this app. It creates a log of all backup histories with a count of how many changes were made. This can be a great help to decide how far back you need to go to get the version of your QBO file that you want. Restore and reverse a few transactions or many; it is your choice.
|
|
|
|
Author:
Steve Arnold, CPA, EA
, Certified QuickBooks Online ProAdvisor
Direct:
507.453.5962
|
|
More Resources from CPA-HQ
|
|
QuickBooks Connect How-To Series: Payroll
If you need a refresher on any number of QuickBooks "how-to"s, including payroll, recordings are available on our website.
|
|
QuickBooks How-To: Recording Funds Received from the SBA Paycheck Protection Program
Get detailed instructions on how to track the spending of your PPP loan.
|
|
Employee Benefit Plan COVID-19 Resources
From the CARES Act to the FFCRA and the SECURE Act, catch up on these EBP resources as they relate to COVID-19.
|
|
Hawkins Ash CPAs
Part of Your Business. Part of Your Life. | www.HawkinsAshCPAs.com
|
|
|
|
|
|
|
|