|
Regardless of historical accuracy, we are sympathetic to people who want to use a thumb or floor rest. Here are some practical solutions to making it easier to hold your recorder.
Thumbrests: Solutions for smaller instruments
For smaller instruments, there are clip-on, tape- or glue- on, and screw-on thumbrests. A clip-on thumbrest may mar the surface of a wooden recorder, though attaching moleskin or thin leather to the inside will help prevent damage.
There are plenty of easy options for wooden recorders!
Looped leather cord thumbrest: This comprises a length of thin leather thong tied to form a circle. One end, looped back on itself, can be fitted over the recorder's foot. The other end can be slipped over the player's right-hand thumb. The length can be easily adjusted by shortening the loop. A thumb-sling has the merit of not marring the recorder. If you choose the color carefully it can be all but invisible to the audience - and it costs almost nothing.
Wine cork thumbrest: A quick solution is to fashion a thumbrest out of a wine cork contoured to match the curve of the center joint and install it using double-sided tape. A neat trick for shaping any type of thumbrest to match your center joint is to wrap sandpaper, grit side up, around your center and then rub your thumb rest along it until it matches the curve of the center. This will help the thumbrest adhere well.
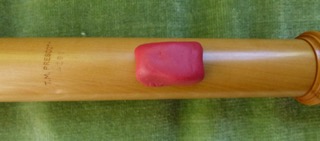
Sculpey® clay thumbrest: Another solution is to make a thumbrest out of Sculpey®. If you're artistic, you can make it quite lovely! After shaping, the Sculpey® is baked in the oven to harden it and then glued or taped to the centerjoint.
Wooden or metal thumbrests:
A more elegant solution is a wood or metal thumbrest. Locate the bottom of the thumbrest mid-way between the 4th and 5th holes. You can test the placement by securing the thumbrest with a rubber band until you're sure you've found the best position. There are even adjustable thumbrests.
How to attach your thumbrest:
Double sided tape: Use a quality, double sided tape, such as that made for hanging posters. The 3M heavy duty mounting tape is a good choice.
Epoxy: Five-minute epoxy creates a permanent bond, but should be reserved for metal thumbrests. This is because if you want to move the thumbrest at a later date, the epoxy bond can be broken by heating the thumbrest with a soldering iron. This obviously won't work for a wooden thumbrest.
Contact cement: Contact cement is applied both to the instrument and to the thumbrest, allowed to dry, and then the parts are pressed together. Some prefer this method because the thumbrest is secure on the instrument, but can be removed with no damage to the wood. To remove a thumb rest, use dental floss to gently "saw" the bond apart. Detailed instructions can be found:
www.prescottworkshop.com/care.html#thumb
Screws: Mark the screw hole positions with a sharp pencil after you're sure you've found
the best position for your metal thumbrest. Pre-drill each hole with a small bit, something smaller than the body of the screws you plan to use. Try to avoid drilling all the way through the wood, although it isn't damaging to the instrument if you do.
If you are playing on a plastic instrument, a
clip-on thumbrest is an ideal solution for supporting the weight of your recorder.
Solutions for LARGER instruments!
Most bass recorders, and some tenor recorders, come with a screwed-in thumbrest with an eye hole for attaching a
neck
strap. There are plenty of sources for padded neck straps, so if yours isn't comfortable, find another one. Neck straps are specific to each instrument size, so choose the correct one.
Floor
rests: If a neck strap puts too much pressure on your neck when playing a larger instrument, try a floor peg, which attaches to the bottom of your bass with Velcro®. The adjustable peg allows you to customize the height of your bass to take the strain off your neck, thumb, or ankles.
The one pictured here was designed by former ARS Board member Neil Seeley.
Sit-upon solutions: Never underestimate the ingenuity of recorder players. You can make yourself a "seat strap" for supporting a larger recorder. Sit on the strap, and put a hook on the other end to attach to your recorder's foot. They're best used under a cushion but can work without. Materials include corrugated plastic display board, sturdy wire and plastic tubing to avoid marring the opening of the foot.
Sources for supplies:
Some suggestions for where you can find floor pegs, neck straps and thumbrests
Photos courtesy of Lazar's Early Music, von Huene Workshop, Prescott Workshop, Anthony Morgan and Mollenhauer Recorders.
|