|
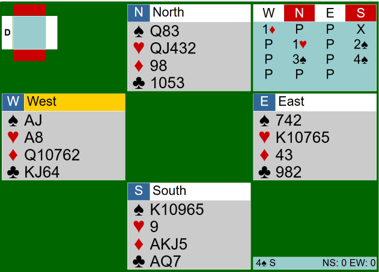
After West’s 15 HCP 1♦ bid (some would choose 1NT) was followed by two passes, Wild Bill chose to double. Calamity bid a quiet 1♥ and the great overbidder jumped to 2♠. A call of 1♠ might have put Calamity on notice that her partner had a pretty good hand, but he wanted to make extra sure she knew.
Calamity’s nice spade support, her helpful looking heart suit and a doubleton diamond should have made jumping to 4♠ an easy bid, but she knew better. She enjoys calling herself “Zen Jane,” having utilized both tai chi and yoga as her way to deal with her partner’s wild bids. In keeping with her tranquil strategy, 3♠ was quite enough.
That did not slow down her partner, however, as he not surprisingly carried on to game. The man is unstoppable.
West had an awkward opening lead as nothing looked appealing, so she finally began with the ♦6, hoping that her partner held at least the Jack. When dummy came down, Wild Bill stopped to contemplate his fate. The diamond lead looked helpful and he was sure dummy’s nine would win the first trick. Wild Bill realized he was in danger of losing one or two spades, one heart, and likely two clubs. And then there was also the fourth diamond to worry about. The contract not only didn’t look promising, Wild Bill couldn’t even decide whether he should let dummy win the trick or overtake it with the ♦J in order to start hearts.
Then he remembered Winston Churchill’s famous “Never, never, never give up,” which inspired Wild Bill to say aloud, “Winnie, why don’t you play the deal?” The others looked at him rather bizarrely, including Calamity. “Guess I’ve gotta play it myself, I suppose,” came next.
One detail Wild Bill was pretty certain about: if his LHO had the ♥A-K, she would have found that lead preferable. Thus, East likely held the Ace or King, but of course not both. But where in the heck were those pesky Jacks, especially the trump Jack?
Wild Bill’s goal was to somehow keep East off the lead since he craved having West play into his tenaces. He decided to win the first trick on board and then lead dummy’s ♥2. He was hoping that his RHO would play low, thereby putting his LHO back on lead. Besides, he didn’t yet have a real plan for ten tricks, so this seemed as good a move as any.
Lo and behold, the heart play worked even better than expected. East followed with the ♥7 (upside down count showing an odd number of hearts) and declarer’s 9 stopped West in her tracks for about ten seconds. Wild Bill knew immediately that his LHO held the Ace but clearly not the King or 10. At last, West reluctantly took her Ace and, not wanting to continue with any of the side suits (a smart move), she cashed the ♠A and continued with the Jack.
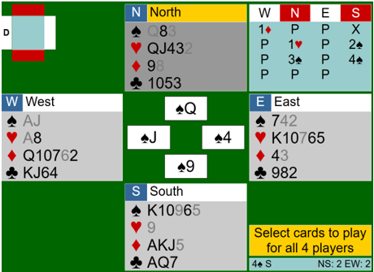
Just then Wild Bill winked at Calamity, realizing that things were finally looking up. He knew he needed two entries to dummy to make optimum use of the heart honors, so he captured the ♠J with dummy’s Queen, while appreciating that dummy’s ♠8 was higher than the East’s remaining ♠7. Wild Bill unblocked his ♠9 in case he needed to lead to the ♠8 later, a good habit for declarers even when unnecessary.
Here was the position after four tricks with dummy on lead:
|