Learn21's Weekly EdTech Update

May 23, 2024

Learn21 Update

District Approach to Beginning the Cybersecurity Journey

The Learn21 Team recently presented a session “District Approach to Beginning the Cybersecurity Journey” with Dustin Ruffel, Director of Technology at Patrick Henry Schools and Liberty Center Schools in Ohio. In this session, we engaged in a collaborative yet complex discussion on the state of cybersecurity in schools. Our goal was to provide attendees with practical steps that can help them begin their journey into cybersecurity readiness and highlight efficiencies, through improved processes and tooling, that will take their school to the next level. 


When starting any journey, a plan and a map are two of the most important tools needed. We used this analogy to discuss the various cybersecurity frameworks including National Institutes of Standards and Technology (NIST), Center for Internet Security (CIS), and CoSN Trusted Learning Environment (TLE) Seal. We discussed choosing a cybersecurity framework and recommended that the framework be board approved. Taking our first steps into Cybersecurity readiness can be overwhelming, so approaching it with the mindset that this work is a journey of mastery. 


This crux of the presentation focused on the NIST Cybersecurity Framework (CSF), which is supported by the National Initiative for Cybersecurity Education and Department of Homeland Security. To measure your progress against the NIST CSF framework, we recommended the Cybersecurity Rubric. This rubric is freely available online and is a creative commons licensed tool. It provides an easy to understand and communicate path toward mastery for all stakeholders.


With our framework and rubric established, we began to tackle the core functions of the framework. We only had enough time in the session to focus on Identify, Protect, and Detect functions. We also love Govern, and Restore, and Recover. We’ll tackle those in follow-up conversations. 


Identify 

Is this the space to open dialogue around how are you tracking assets in your organization? Do you have a clean and clear inventory that is kept up to date? How do you manage your online identities and ensure they are well-maintained? We emphasized the need to establish baselines for data including enrollment figures, buildings, and asset counts. These metrics can be vitally important when detecting rogue activity on your network. 


Protect and Detect

This is where we shared the idea of the crown jewel data - data and systems that are mission-critical. Many attendees expressed that they have moved much of their infrastructure into the cloud; however, this shifted the priorities to who owns these mission-critical systems and how do you ensure access in catastrophic scenarios? 


Dustin and the Learn21 team shared some practical strategies including securing physical assets and automating identity processes with tools like TDT-Asset and TDT-Identity from the Tech Director Toolbox by Learn21. There was quite a lively discussion around anecdotes that highlighted the real-world impact of cybersecurity lapses, emphasizing the need for continuous monitoring and role-based access controls.


The session provided actionable insights tailored to the unique needs of schools, focusing on proactive measures to safeguard against emerging threats and ensure data integrity. 


The Learn21 Team appreciates Dustin's story and his commitment to starting open, honest discussions on the challenges that technology departments are facing. By partnering with Learn21, you too can experience the power of centralized data at your fingertips and a MARVELous community of EdTech leaders.

Video 6: Enhancing Online Learning Through AI

We're excited to announce the sixth video in our 11-week series, "Turning Research into Practice: Leveraging Generative AI in K-12 Education" is up on YouTube!


This week we are addressing the question, What does the research say about using generative AI in online learning? In this video we examines the role of AI in enriching online education, including its impact on accessibility, engagement, andd personalized learning pathways.

allenges.


Check it out, leave a comment and let us know what you think. We're reviewing and reporting on the research to amplify your abilities. Let us know how we're doing. Oh, and Like and Subscribe while you're there.

Transferring files like AirDrop, but with any device

Apple products offer a quick and easy way to send files between devices using AirDrop. Unfortunately, this only works between Apple devices, so if you have an iPhone and a Windows laptop you can’t use AirDrop. However, there are two options that work between any devices: PairDrop and LocalSend.


PairDrop

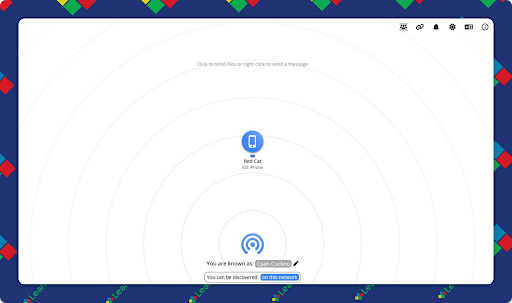
PairDrop is a website that can be used on phones, laptops, and desktops. When you visit the site, you get an interface that looks a lot like AirDrop.

Devices are given a random name, but you can edit the name by clicking the pencil icon beside the name.


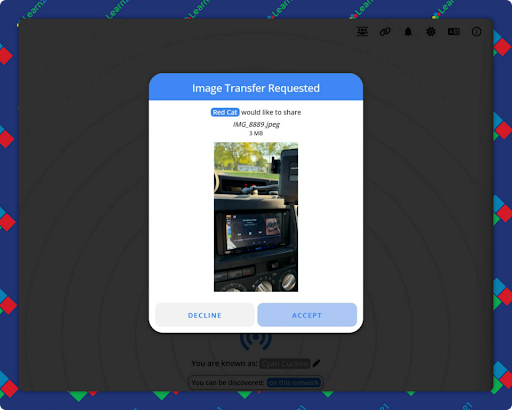
To transfer a file, click on the destination device or drag and drop a file. The recipient will then accept the transfer.

There are a couple of caveats with PairDrop. It requires the devices to be on a local network that is set up to allow the devices to talk to each other. If they can’t see each other, you can’t transfer files. However, you can create a room which will allow you to transfer files.


PairDrop Rooms

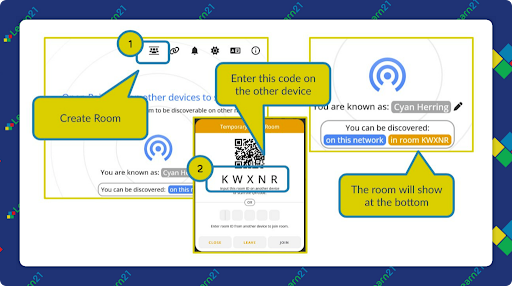
Click on the group icon at the top, and a randomly named room will be created. The five character code can be entered into the other device, and they’ll then be able to see each other and send files.

The last feature I want to share about PairDrop is the ability to send short messages. On desktops/laptops you can right-click on the destination machine and on mobile you can tap and hold, and then you can send a message. This could be used to send email addresses, websites, or other pieces of data.


LocalSend

LocalSend uses an app instead of a website and as such, can work in some situations where PairDrop doesn’t. However, it doesn’t have the capability to use a private room like PairDrop for those times when the local network doesn’t want to cooperate.


Its feature set is pretty much the same as PairDrop’s. I’m going to keep both at the ready, just in case. For personal devices, it’s easy to install LocalSend on all of them and easily send files. For one-off transfers or when LocalSend isn’t available, PairDrop is where it’s at!


As with any new app, be sure to read the privacy policy before using. Stay safe out there!

Tips and Tricks

Taking full webpage screenshots

While all computers and devices have options to take screenshots, those screenshots are limited to whatever is viewable. Sometimes you want to capture the full page of a website. Chrome/Edge can do this with an extension. Firefox has the feature built in.


To get started with Chrome or Edge, install the Page Screenshot extension and pin it to the toolbar. There are a couple of options you can set by right-clicking on the icon in the toolbar, but the defaults are fine. To use the extension, navigate to the website and click the icon. The page will scroll as the extension captures everything. When finished, you'll be asked where to save.


It's even easier on Firefox. Right-click somewhere on the page and select Take Screenshot. As you mouse over the page, Firefox will automatically highlight parts of the page, but you can also click and drag to select. In the upper right there are two buttons. Save Full Page will scroll and capture the page, while Save Visible will capture the currently visible portion.


After the capture, Firefox will show you your screenshot, and from there you can copy it to the clipboard or save it as an image.


Using the built in screen magnifier when presenting

Microsoft Windows and macOS both have a built-in screen magnifier as a part of their accessibility features. Normally it’s used for people with vision impairments, but it also can come in handy when presenting to a class.


Once turned on, you can use a keyboard shortcut in combination with your mouse or trackpad to zoom in and out at will. This allows you to zoom in on content for your class, minimizing distractions while also giving your students a better view of the screen.


Windows Screen Magnifier - To turn on the screen magnifier, hold down {Windows}{+}. The screen will zoom in, with the magnified portion of the screen following your mouse cursor. To zoom in more, press {Windows}{=} and to zoom out use {Windows}{-}. If you have a mouse, you can hold down {Control}{Alt} and scroll the mouse wheel, however, I couldn’t get the scroll to work reliably with the scroll gesture on a trackpad.


macOS Screen Magnifier - Open up System Settings, click on Accessibility ➡ Zoom. Turn on Use scroll gesture with modifier keys to zoom. Now when you hold down {Control} and scroll up or down with the trackpad (two fingers on the trackpad) or with the mouse scroll wheel, the screen will zoom in or out.


ChromeOS - Head on over to Settings and Accessibility. Turn on Full-screen magnifier and the screen will zoom. You can zoom in and out with {Control}{Alt} and two-finger scroll on the trackpad, or use {Control}{Alt}{Brightness Up}/{Brightness Down} to zoom with the keyboard.


You can leave magnification turned on for macOS and ChromeOS and you won’t even notice it’s there. Windows isn’t as nice, so you’ll probably turn it on or off when you need it or not.


There are some settings that control how the mouse pointer and keyboard acts while zooming. You can see those features in your Control Panel/System Settings/Settings.


Projection issue

There is one caveat when using the screen magnifier to present. If you are using one of the wireless technologies to share your screen, the magnification may not get sent through to the display. You’ll want to practice first to make sure it does what you want it to do.

Extra Credit

New research was published that purported to show that writing by hand is better than typing for memory and learning. However, digging into the experiment didn’t leave me with a lot of faith in what they found. The experiment came to its conclusion based on the brain activity measured when writing vs typing.


They concluded that “Our findings suggest that the spatiotemporal pattern from visual and proprioceptive information obtained through the precisely controlled hand movements when using a pen, contribute extensively to the brain’s connectivity patterns that promote learning.” That would be something very interesting if it weren’t for the fact that participants were only allowed TO ONLY TYPE WITH THEIR RIGHT INDEX FINGER.


The research paper lists several benefits of writing longhand versus typing, which I would recommend reading, but the paper itself isn’t something I personally would use to argue for less typing.


An analysis of data collected by the Gallup World Poll shows that the internet may boost well-being and have other positive effects. The study looked at data collected from 2006 to 2021.


Do SMART goals work (h/t Another Think Coming)? The issue arises because SMART goals don’t allow multiple ideas of success, so if you don’t hit a specific, measurable aspect of the goal, you fail.

🙋‍♂️ Bytes and Insights is written by Eduk8me’s Ryan Collins who writes about education and educational technology. He is also the Director of Technology for Kenton City Schools in Ohio. Sign up for his Of Bits and Bytes newsletter at https://eduk8.me!


If you'd like to take a hiatus from Bytes & Insights, please use the Update Profile link below. This will allow you control over which emails you receive from Learn21.

X Share on X
LinkedIn Share on LinkedIn

www.learn21.org

LinkedIn        X        YouTube        Instagram