|
Become Your Own Ensemble:
Recording Multi-Track Pieces
By Jennifer Carpenter and Ruth Seib
| | It’s 2025 and many of us are happily re-engaged in opportunities to play with others! In the not-so-distant past, recorder players feverishly gathered online through virtual apps like Zoom to connect with our community. During the “Covid years” our wonderful recorder teachers and a number of ARS local chapters sponsored virtual sessions that allowed participants to play-along with a multi-track recording, and this virtual session format continues to be popular. For example, the North American Virtual Recorder Society presents multiple, virtual play-along sessions a month with leaders from across the Americas and Europe. Each of these sessions is made possible by teachers/performers and their in-home ad hoc recording studios. One question performers still get asked is “how do I do this kind of recording myself?” | |
Creating and listening to your own recordings can be a fun, informative, and creative endeavor. Your own recordings are an excellent learning tool - you can hear how those varied articulations are really coming across; how your breath is shaping the phrasing, and it certainly lets you know when you’ve pushed your air too far or not enough! Is your ornamentation effective in expressing the affect of character of a piece? There are many ways to improve your playing through listening to recordings of yourself.
With multi-track recordings, you can become your own ensemble, too - and a big bonus is you know the strengths and weaknesses of each player! Perhaps finding an ensemble in your area is not a possibility; or the varying levels of players make it difficult to try that ensemble piece you’re itching to play. ALL music is now open to you to explore - not just solo music.
| Thankfully, this adventure does not have to be overly expensive or difficult. Once you understand the basics, then you open up many possibilities for creating your own recordings of solo and ensemble music. There are apps available, particularly if you want to do video and audio (Acapella being one of the primary ones), but this article focuses just on audio recording, generally through the use of a computer or tablet/iPad. | |
Hardware
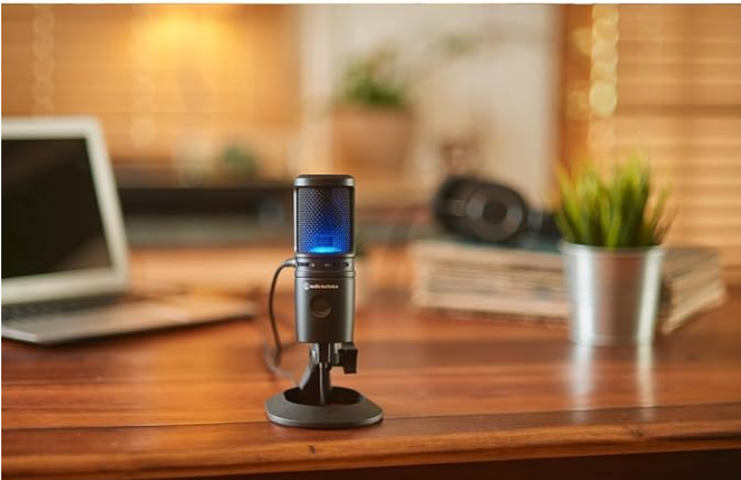
One hardware purchase which will significantly improve your sound is an external microphone, and it’s the primary expense necessary for satisfactory recordings. An external microphone will be significantly better than the built-in microphone in your computer, tablet/iPad, or phone. For external microphones that can plug directly into your computer, we recommend the:
A slightly less expensive option is the Logitech Yeti USB microphone.
| |
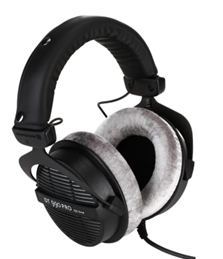
You will also need over-the-ear headphones. We recommend:
An external microphone and headphones are the essentials for examining your own playing or creating an ensemble piece. However, if you want a little more control over the input of sound, then you might consider using a microphone that you plug into an audio interface, which gives you greater control over the intake of volume. Our suggestion is the Audio-Technica AT 2020 Cardioid Condenser microphone plugged into the Focusrite Scarlett 2i2 Audio Interface, which works with any DAW (digital audio workstation - the software you use to record). This microphone will require a microphone stand (many inexpensive options, thankfully).
| |
Software (DAW)
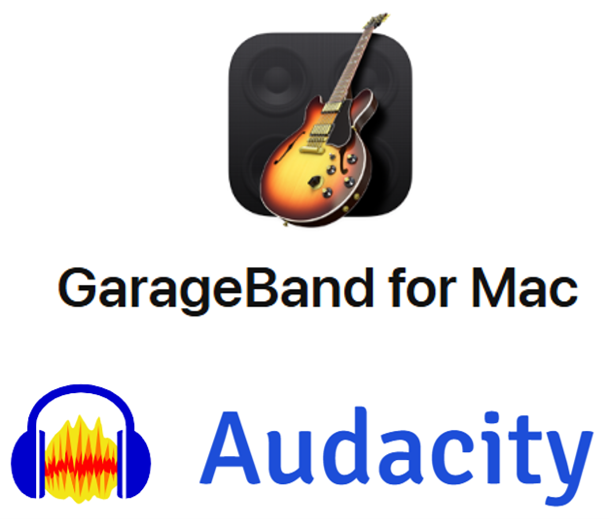
Once you have a good external microphone, the software you need to get started is free!
-
If you are an Apple user, then we suggest using GarageBand, which comes free with your Apple device.
-
Audacity is another free DAW that can be used on PCs and Apple devices alike and can handle all of your multi-track projects. For ease of describing the process, we use Audacity as the example DAW since it is available for the two major platforms.
There are DAWs that you can purchase and offer more options for sound intake, programming, and editing possibilities (Reaper and Cubase are two such programs); but you don’t need these to accomplish the simple benefits that recording yourself offers.
| |
Multi-Track Recording Process with Audacity (the steps are very similar for other DAWs like GarageBand)
-
Download and install Audacity.
- Plug the USB mic into a USB port on your computer. The computer should recognize your new hardware.
- Open Audacity, and under View, make sure you are viewing the Device toolbar. In that toolbar, make sure that both Microphone and Speakers are using your new mic.
- Start with a Rhythm Track. This is your metronome, which will allow you to coordinate all of the voices much more easily. To do this:
- Select Generate, and then select Rhythm Track.
- Choose your beats per minute (metronome speed), the number of beats per measure, and the number of measures. We suggest allowing at least two extra measures, which you’ll listen to as the Count-in before you start playing. You’ll see this track displayed in the Audacity window.
- Important!! For multi-track recordings, make it your default setting to start a new track each time you record. Go to Edit, Preferences, Recording, and select “Record on a new track” (also make sure that “hear other tracks while recording” is checked).
- Now you’re ready to record!
- Be sure that before you record, you click the left-pointing arrow so your new recording starts at the beginning.
- Click the “Pause” button, and then click the red Record button. Recording is now ready and paused, waiting for you to click again on the Pause button. When you have your instrument in hand ready to play, click the Pause button to start actually recording.
- Listen to the first two measures of the Rhythm track as a count-in and then begin playing on the third measure. When you’ve come to the end of the piece, wait a few seconds and then click the square “Stop” button.
- Click the left-pointing arrow button to return to the very beginning of the recording. You should now see two tracks, the rhythm track and the track you just recorded. You can listen to these (still through your headphones) by clicking the green “Play” button.
- If you don’t like the track you recorded, you can delete it – click the “X” next to the track name, and then start at Step 6 to re-record.
- Repeat this for each voice in the piece.
- When you have recorded all of your tracks and are satisfied with them, you will want to do two things:
- Select File, Save Project, Save Project As, navigate to a folder where you want to save your work, and give the Project a name. This is an Audacity Project, meaning you can reopen it in Audacity and keep working on it anytime you want, for instance to re-record tracks.
- Mute the Rhythm track, then click on File, Export Audio. In the resulting dialog, you can select an export format (probably mp3) and name your audio file. Again, select the location where you want to save this file. The resulting .mp3 file can be played by most audio players, shared with friends, etc.
| |
Further thoughts on voicing and editing
- Microphone placement: The placement of your microphone and the distance from your instrument plays a huge role in the equalization of the different voices. Try to place the microphone in front of and above the instrument (this is where a mic stand is handy). Microphones have a “front” and “back” - make sure the “front” is facing you (usually clearly labeled on the mic). For lower instruments, move closer to the microphone; for higher instruments, move further away from the microphone (consider physically turning away from the microphone for very high pitches).
- In general, aim to record from the bottom voice upward in order to “tune down” to the lowest voice. This, however, can sometimes be a problem if the lowest voice doesn’t come in for a while, or if you want to phrase the lower voices to a melodic line. In which case:
- You may decide to start with the voice that enters first; or start with the melodic line.
- When doing this, an option is to record upper lines first to catch the phrasing and timing best. But once the lowest voice is recorded, you could re-record the upper lines so that you’re “listening down” to tune to the low voice.
- Adding effects (more advanced, but fun to play around with options!):
- One option is to keep it simple and only add Reverb and EQ (Equalization). You can play with the various knobs/adjustments available to you and determine what is the right amount of reverb and EQ that you may need.
- Another option is to play with panning. When you record, all the tracks are essentially on top of each other. To help mimic listening to a live recorder ensemble, you can adjust (pan) the various tracks so that some are coming a little more out of one speaker than another. However, if you have the option, you want to record in mono - this means that the sound is captured in a single audio channel (sounds in both ears equally), which gives us greater clarity and consequently, ease of editing.
Don’t let the steps intimidate you - once you’re set up it’s pretty straightforward. The anticipation is definitely more intimidating than the execution! As you get more comfortable, then you can play around with adding effects to help create the sound you desire. Remember, the ultimate goal for you is to provide immediate feedback on your own playing, offer you the chance to become your own ensemble and play repertoire you may not have thought you would have a chance to perform. We hope you have fun creating your own multi-track recordings!
**All links are to Amazon for ease of showing you the products. You can find this equipment at a myriad of music stores, online and in person.
| |
|
Jennifer Carpenter and Ruth Seib are both former ARS Board members. Jennifer is a recorder professional and teacher who lives in Colorado Springs, CO. Ruth is active in the Sarasota FL chapter and the Sarasota Earlye Musicke Consort, as well as the Marsh Mountain Consort in MD.
| |
Do you enjoy our ARS NOVA emails?
Click here for our archives, with articles on many topics ranging from how to care for your recorders, to useful apps, to scholarship and grant opportunities though ARS. If you've received this from a friend, sign up for your own monthly subscription using this link.
| | |
How to Join the ARS
Take advantage of our 1/2 price rate for first-time members! Get immediate access to all the information available on our website, as well as other member benefits including the quarterly American Recorder magazine.
Click here for info
| | |
P.O. Box 480054 Charlotte
NC 28269-5300
Phone: 1-704-509-1422
Toll Free: 1-844-509-1422
Fax: 1-866-773-1538
| | | | | |