|
How to Set Up Student Groups in Google Classroom
Open Google Classroom:
Go to classroom.google.com and log in with your Google Workspace for Education account.
Select Your Class:
From the dashboard, click on the class where you want to create groups.
Navigate to the "People" Tab:
At the top of the class page, click on the “People” tab. This tab lists all the students enrolled in your class.
Create a New Group:
In the top right corner of the "People" tab, click the "Create Group" button. This will open a new window where you can start creating your group.
Name Your Group:
Enter a descriptive name for your group. For example, "Math Group A" or "Science Project Team 1." This helps in easily identifying the group later on.
Select Group Members:
Check the boxes next to the names of the students you want to include in this group. You can select as many students as needed for your group.
Save the Group:
Once you’ve selected the students, click the “Create” button to save your new group.
Repeat for Additional Groups:
If you need multiple groups, repeat the process for each group. You can create up to 50 groups per class.
Assign Work to a Group:
When creating an assignment, quiz, or discussion post, look for the “Assign to” option on the right side of the assignment screen. Select the specific group you want to assign the work to from the dropdown menu.
Manage Groups:
You can edit or delete groups at any time by returning to the "People" tab, selecting the group, and making the necessary adjustments.
By managing student groups in Google Classroom, you can differentiate instruction, organize group projects, and enhance collaboration within your classroom.
Everything in Google Classroom Has a Link
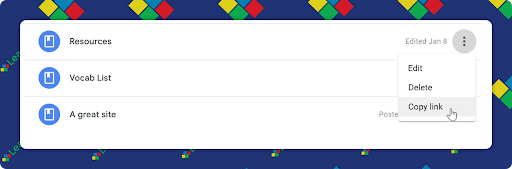
In Google Classroom, copying links to various elements like the class stream, assignments, and resources is straightforward. For assignments or materials, open the specific item and click the three dots in the top right corner, then select "Copy link."
|